Change DNS (No Root 3G/Wifi)
Description
How To Change Your DNS (Domain Name Server) Settings Easily
Have you ever found yourself on a website, but the site is asking for an American or British account? You may be thinking that this problem is happening because of your IP address. However, the real issue lies in your DNS settings. Your domain name server (DNS) settings are the ones giving out your location to the websites you visit.
Introduction
DNS, or Domain Name System, is a network of servers that translates domain names (like www.google.com) into IP addresses (like 74.125.224.72). When you type a domain name into your browser, your computer contacts the DNS server associated with that domain and requests the IP address for the website. The DNS server then responds with the IP address, and your computer connects to the website at that address.
Most internet service providers (ISPs) will provide you with a DNS server that will work for most websites. However, there may be times when you need to change your DNS settings, such as if you’re trying to access a website that’s blocked by your ISP or if you’re experiencing slow speeds or other problems with your current DNS server.
Luckily, changing your DNS settings is easy! In this article, we’ll show you how to do it on Windows 10, macOS, iOS, Android, and more.
How to change DNS without rooting:
If your Android device isn’t rooted, you can still change your DNS settings without root privileges. The process is a bit more complicated, but it’s still doable.
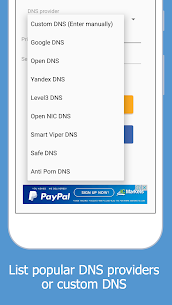
To change your DNS settings on a non-rooted Android device, you will need to use a third-party app. We recommend using the DNS Changer app, which is available for free on the Google Play Store.
Once you have installed the DNS Changer app, launch it and follow the instructions on the screen to change your DNS settings. You will need to enter the IP addresses of the DNS servers that you want to use.
You can find out the IP addresses of public DNS servers by doing a quick Google search. We recommend using either 8.8.8.8 (Google Public DNS) or 1.1.1.1 (Cloudflare).
That’s all there is to it! Once you have changed your DNS settings, you should start seeing faster and more reliable internet speeds on your Android device.
Setting up a VPN for Android and iOS devices
If you want to change your DNS settings on Android or iOS devices, it’s pretty easy to do. Here’s a step-by-step guide:
1. On your Android device, open the Settings app and go to the Network & Internet section.
2. Tap on Wi-Fi and then long-press on the network that you’re connected to.
Save your changes and exit the Settings app.
7. On your iOS device, open the Settings app and go to the Wi-Fi section.
8. Tap on the network that you’re connected to and then scroll down and tap on Configure DNS.
9. Select Manual from the options at the top of the screen and then enter the DNS 1 and DNS 2 addresses that you want to use in the fields below. (You can find a list of public DNS servers here.) 10 Save your changes and exit the Settings app
Setting up a VPN for Windows, Mac, Linux
If you’re looking to change your DNS settings for increased privacy, security, or speed, it’s easy to do on Windows, Mac, and Linux. Here’s a step-by-step guide:
1. Find your current DNS settings.
Under the General tab, look for “Internet Protocol Version 4 (TCP/IPv4)” and select it. Click the Properties button. Your current DNS settings will be listed under “Obtain DNS server address automatically.”
2. Choose a new DNS provider. There are many options available, but we recommend OpenDNS or Google Public DNS for their reliability and security.
3. Configure your new DNS settings. Again in the Control Panel, go to Network and Internet > Network Connections
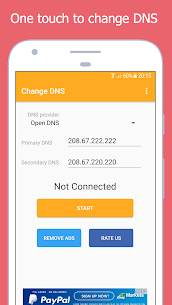
This time, select “Use the following DNS server addresses.” Enter the primary and secondary addresses for your chosen provider (e.g., 208.67.222.222 and 208.67.220). Click OK to save your changes.
4 That’s it! Your new DNS settings should now be active
Setting up a VPN on router firmware
If you want to change your DNS settings easily, you can do so by setting up a VPN on your router firmware. This will allow you to access the internet using a different DNS server, which can be useful if you’re trying to access websites that are blocked in your country.
To set up a VPN on your router firmware, you’ll first need to find a reputable VPN service. We recommend ExpressVPN, as it’s one of the most popular and reliable providers out there. Once you’ve signed up for a VPN service, you’ll need to download and install the software onto your router.
Then, connect to a server in a country where the website you’re trying to access is not blocked. For example, if you’re trying to access a website that’s blocked in China, you could connect to a server in Japan.
Images
Related apps


Most rated apps
-
 SHAREit: Transfer, Share Files6.21.55_ww Smart Media4U Technology Pte.Ltd. December 2, 2022
 -
 Google MapsVaries with device Google LLC December 6, 2022
 -
 NetflixVaries with device Netflix Inc. December 16, 2022
 -
 Gboard – the Google KeyboardVaries with device Google LLC December 5, 2022
 -
 imo-International Calls & ChatVaries with device imo.im December 16, 2022
 -
 TikTok LiteVaries with device TikTok Pte. Ltd. December 1, 2022
 -
 ColorNote Notepad NotesVaries with device Notes December 16, 2022
 -
 TuneIn Radio: News, Music & FMVaries with device TuneIn Inc December 16, 2022
 -
 QR & Barcode ScannerVaries with device Gamma Play December 2, 2022
 -
 WiFi Passwords Map Instabridge22.2022.12.14.1742 Degoo Backup AB - Cloud December 17, 2022
 -
 One Booster: Antivirus&Cleaner2.1.2.0 One Dot Moblie Limited December 5, 2022
-
Most viewed Apps
-
 Call Recorder – CallsBox5.6 SMSROBOT LTD December 6, 2022
 -
 CrookCatcher – Anti Theft2.2.2 CrookCatcher December 16, 2022
 -
 TrackView Viewer3.8.02 TrackView November 6, 2022
 -
 Drama Live | IPTV Player11.0.2 Sneig November 6, 2022
 -
 QR code reader1.24.01.1 BACHA Soft December 7, 2022
 -
 Hushed – Second Phone Number5.7.4 AffinityClick Inc. December 6, 2022
 -
 Hidden Apps – anti Spyware1.0.6 Hidden App Studio December 6, 2022
 -
 True Phone Dialer & Contacts2.0.17 Hamster Beat December 6, 2022
 -
 FTP Server3.1.9 HNC Developers December 6, 2022
-
Best Rated Apps
-
 ToTok – Free HD Video Calls & Voice ChatsDecember 16, 2022
 -
 Sleep Sounds – sleep melodies2.3.22 Craftsman Spirit November 6, 2022
 -
ColorNote Notepad NotesVaries with device Notes December 16, 2022
-
True Phone Dialer & Contacts2.0.17 Hamster Beat December 6, 2022
-
 Pocket Sense – Theft Alarm App1.0.25 Mirage Stacks December 17, 2022
 -
QR code reader1.24.01.1 BACHA Soft December 7, 2022
-
 All tools3.7.3 ATEU Softwares ® December 7, 2022
 -
TuneIn Radio: News, Music & FMVaries with device TuneIn Inc December 16, 2022
-
 Bitwarden Password Manager2022.10.0 Bitwarden Inc. December 5, 2022
 -
 Anti Spy Scanner & Spyware4.3.1 Protectstar Inc. December 16, 2022
-