Meta Business Suite
Meta Platforms Inc.
Jan 28, 2014
Feb 3, 2026
538.0.0.21.106
Varies with device
100,000,000+
Images


Description
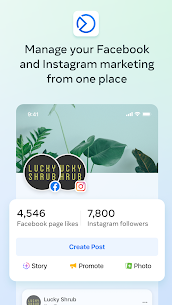
Meta Business Suite** is a free, all-in-one management tool designed for small-to-midsized businesses to manage their Facebook and Instagram accounts from a single dashboard.
Available as both a **mobile app** and a **desktop site**, it acts as a “mission control” for your social media presence, allowing you to handle everything without constantly switching between different apps
Core Features: What can you do?
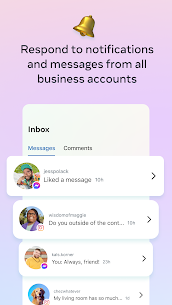
* **Unified Inbox:** Read and reply to messages and comments from Facebook, Instagram, and Messenger in one place. You can even set up **Automated Responses** (like “Instant Replies” for when you’re away).
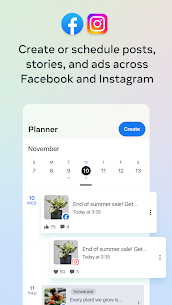
Content Planner:** A visual calendar where you can create, draft, and schedule posts, Stories, and Reels for both platforms at the same time.
Insights:** View detailed analytics on how your content is performing, who your audience is (age, location, gender), and which posts are getting the most engagement.
Ad Management:** Create simple ads and boost posts directly from the app to reach a wider audience.
To-Do List:** View notifications and tasks to stay on top of customer inquiries or upcoming scheduled content.
How to Use Meta Business Suite (Step-by-Step)
1. Setup
Download:** Get the “Meta Business Suite” app from the App Store or Google Play Store.
Link Accounts:** Log in using your personal Facebook account. You must have a **Facebook Page** (not just a profile) and an **Instagram Professional/Business account**.
Connect:** In the app settings, ensure both your Facebook Page and Instagram account are linked to the same “Business Account” or “Portfolio.”
2. Managing Messages (The Inbox)
Tap the **Inbox icon** at the bottom.
Filter by Facebook, Instagram, or Messenger.
Pro Tip: Use “Labels” (like “New Customer” or “Important”) to organize your conversations and follow up later.
3. Creating and Scheduling Content
* Tap the **Plus (+)** button or “Create Post.”
* Select whether you want to post to Facebook, Instagram, or both.
* Upload your media, write your caption, and add hashtags.
* Instead of “Publish Now,” tap **Schedule for later** to choose a specific date and time when your audience is most active.
4. Checking Performance
* Tap the **Insights icon** (usually looks like a bar graph).
* Check your **Reach** (how many people saw your post) and **Engagement** (likes, comments, shares).
* Use this data to decide what kind of content you should make more of.
Related apps


Most rated apps
Most rated apps


